An introduction to Computerized Embroidery
By Gillian Suggett – Embroidery Specialist with Wilcom Europe Ltd
Introduction
In this article I aim to give an overview of industrial embroidery and hope to demystify some of the processes involved. As with any design production there is an art to it but it is not a black art: it is easily learned, produces high quality results and might just provide your business with that extra stream of revenue that it needs. But first let us begin with what embroidery is.
The verb embroider has two senses: (1) to decorate with needlework, and (2) to add details to.
In both instances to embroider is to ‘embellish’. This is the bit we are interested in, for ‘to embellish’ is clearly an activity of adding value to something.
Context – embroidery in everyday life

The use of embroidery for decoration and branding is now commonplace in our homes, our places of work and on the high street. Widely used on clothing, accessories and textiles for interiors it has become an integral part of our visual world. When compared with print, embroidery is more three dimensional; offering high lustre and/or textured effects. It is associated with quality, adding value to a product in both the visual and tactile fields of consumer appreciation.

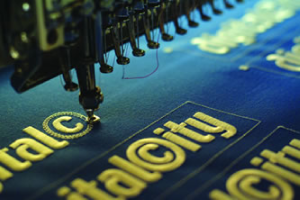
The embroidery we see today is largely produced on computer controlled embroidery machines. They are specially engineered machines that have a multi-needle fixed ‘embroidery head’ and a frame holder that moves the framed product (for example a garment like a Tshirt) in either of two directions so that the embroidery design can be sewn. The frame holder is known as a pantograph; think of it as a graph plotter because it moves to (plots) the exact location (co-ordinates) of the design expressed in x and y values. The design is created within a grid (known as a ‘field’) with x being the horizontal axis and y the vertical axis. Therefore any point on the design can be identified in values of x and y, a co-ordinate in this field would be written, for example, as x249,y786. The embroidery machine reads these co-ordinates from the design data file and moves its pantograph into position to receive each new stitch from the machines’ stationary needle head.

The embroidery design is created on a computer using specialised ‘digitising’ software. Artwork is interpreted in stitches by plotting a route that the embroidery machine needle/s will take when stitching the design and applying machine functions like colour changes. When complete the design is transferred to the embroidery machine in a specific ‘stitch file’ format or language. Once the design is in the memory of the embroidery machine, the operator teaches the embroidery machine how to sew the design i.e. which needles to use for which colour and then starts the machine embroidering.
The computerised embroidery process can be broken down into six functional activities:
- Interpret artwork and digitise the design using specialised software
- Save the design as a stitch file that can be understood by the embroidery machine
- Read the stitch data file into the embroidery machine
- Teach the machine how to embroider the design
- Frame or hoop the fabric you wish to embroider on and slot into the machine arms.
- Start the machine stitching and run until embroidery design is complete and finished.
 1. Interpret artwork and digitise the design using specialised software

Artwork may exist as a printed document or in a digital form like an EPS or bitmap file (files ending in .eps or .bmp). The design would be either scanned or opened into the specialised digitizing software and displayed on screen. Older systems require the artwork to be enlarged and plotted on a tablet, but modern systems use ‘on screen’ digitizing methods. The operator can zoom in and use the pointer of the mouse to define the design in stitches.

The process of interpreting the artwork in stitches is both a technical and creative process.
Technical requirements would consider the type of fabric to be embroidered on, the scale of the design and the number of needles/colours the embroidery machine can accommodate. Because fabric is not ridged, it will move about when being embroidered upon. When digitising a design an operator will try to both reduce and anticipate the amount of movement, so that the design looks ‘as intended’ when sewn. Some fabric types move more than others especially those that have stretch properties, and some have a surface pile like towelling which can also present technical challenges. The sequence in which a design is created is also very important to reduce fabric movement. As a general rule larger areas of stitches will move the fabric (and hence the design) more than smaller ones. A large block of stitches will tend to pull the fabric together in that area. The operator will also need to consider the number of stitches created and how often the machine slows and/or stops to perform a function like a trim or a colour change, as all these elements affect the length of time a design will take to produce and impact on machine productivity and ultimately the total cost of producing the embroidery design.

The creative process is the interpretation of the design in stitches. It is true to say that there is rarely a definitive way to interpret artwork in stitches. Even two experienced operators, or ‘digitisers’ as they are known, will not produce identical results when digitising the same moderately complex design. There are certain aesthetic and technical conventions but beyond these the operator is free to choose from a palette of stitch types to create the embroidery design. Although each block of stitches is essentially a grouping of x and y values these numbers are hidden from the digitiser and the interface with the software involves working with shapes. The software automatically fills in the x and y values in the background.
Early systems required the operator to plot every stitch movement and needle penetration, now stitch types are pre-programmed and can be used to create stitch blocks or objects (areas of the design) that are filled with a certain stitch type. Solid objects may be filled typically with ‘satin or fill stitch’, whilst an outline may use a ‘run stitch’

The digitiser will create blocks using different stitch types, different angles of stitching and changes of colour. The stitches in the design will normally be created in the order in which they will be embroidered on the machine. So, for example, if the design has a background fill with detail on top, the background would be created first and then the detail added. The digitiser constructs the design as a series of stitching actions punctuated by colour changes e.g. the background fill (colour a) followed by the surface detail (colour b) followed by additional detail (colour c) etc. Digitising software has experienced major developments in the last 10 – 15 years; parts of the process have been automated, digitisers now have more creative tools to create and edit stitches than ever before, but fundamentally the process is the same.
2. Save the design as a stitch file that can be understood by the embroidery machine.
Once the embroidery design is complete the design is saved in the internal file format of the specialist embroidery software, an example of this would be Wilcoms native ‘emb’ file (filenames ending .emb). This is important if the design needs to be changed or edited later as working with a native file makes this easier.
What makes the process slightly more complicated is that embroidery design software and embroidery machines don’t speak the same language i.e. they have different file name endings. However it is a simple matter to address. The operator now needs to create copy of this file in a format or language the embroidery machine can read and understand. Each embroidery machine manufacturer has developed their own embroidery file format so there is no single industry standard. However, all the files contain stitch movement co-ordinates and machine functions and are supported for output in the digitising software.
3. Read the stitch data file into the embroidery machine
As an example a Barudan machine requires a ‘DSB’ file, and a Tajima machine requires a ‘DST’ file.
The DSB or DST file needs to be transferred into the memory of the embroidery machine, this might be done via a cable from the PC running specialist software, or via a flash card or USB stick.
4. Teach the machine how to embroider the design
Once the design is in the memory of the embroidery machine the machine operator needs to teach the machine how to sew the design i.e. which needles and what orientation to use. The needles are numbered and each is threaded with a different colour. The embroidery design software provides the operator with a schedule of which colour is to be used in each stage of the design and the stages are numbered in sequence. To teach the machine the operator assigns the relevant needle number (colour) to each stage. Each threaded needle will stitch its colour block or blocks until a colour change is required. It will then tie off its thread and park and the next relevant needle will move into position to begin sewing
5. Frame or hoop the fabric you wish to embroider on and slot into the machine arms.
The frame or hoop is based on a traditional embroidery ring; the fabric to be embroidered is secured in the frame rather like the skin on a drum. The purpose of this is to secure the fabric in a mechanism that can be slotted onto the embroidery machine so that it can be moved about accurately by the embroidery machine pantograph. Framing also serves to stabilise the fabric, to avoid the movement of the design whilst being stitched as described above. Further support is added by applying backing to the fabric which is a paper-like product inserted under the fabric and is often also framed with it.
 6. Start the machine stitching, run until embroidery design is complete and finished.

Embroidery machines use the conventional ‘lock stitch’ mechanism, using a top thread and a bottom ‘bobbin’ thread to create a stitch. The bobbin, located beneath the material being stitched, catches the thread of the penetrating needle and carries it in a circular direction creating a loop through which the bobbin thread passes locking the stitch to the back of the material.
Unlike a conventional sewing machine the computerised embroidery machine is driven automatically moving in any direction within a specified field, changing needles (colour), trimming thread and stitching at speeds of up to 1200 stitches per minute. It also has a more complex tension mechanism which can be key to the productivity of the machine and the finished quality of the embroidery. A well maintained embroidery machine, using good quality threads and stitching a professionally digitised design can complete an embroidery design independently without stopping and requiring operator intervention.
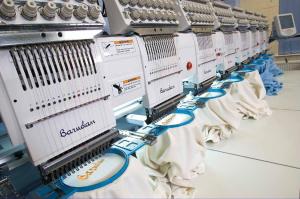
Embroidery machines are available with single or multiple heads; small and medium enterprises will normally operate machines with 1, 2, 4 or 8 heads whilst large companies may use machines with up to 38 heads. Each head produces one embroidery design and all the heads are normally working at the same time.

Each head will have a specific number of needles up to 15, machines with either 9 or 15 needles being the norm. Each needle represents an individual colour in the design. If the head has 15 needles and the design requires 16 colours the operator will be required to rethread one of the existing needles with the 16th thread colour. This would not normally be acceptable in a commercial production environment as rethreading for each design produced would represent significant machine down time.
The key to good quality embroidery production is understanding and controlling the variables. And this is where the importance of really good embroidery design software cannot be over-emphasised.
The embroidery process is quite complex, from design interpretation, to the production requirements of embroidery machines but the results can be very satisfying, can add significant value, and cannot be achieved in any other way.
Filed under: How to.... | Leave a Comment
Tags: computer embroidery design software, embroidery, embroidery machine, machine embroidery, start an embroidery business, starting an embroidery business, what is embroidery
About our Wilcom Blog Contributors
Wilcom Newsletter

No Responses Yet to “An introduction to Computerized Embroidery”